
Know when to hold ’em, know when to walk away… (from the head that is.)
I can knock another project off the list. One thing we didn’t have visibility into was how full the holding tanks were at any given time. This led to some situations where we had to unexpectedly make one of the toilets off-limits for a day or more without any real warning ahead of time. Knowing how quickly we are filling the tanks would help with balancing the use of the two heads we have, as well as planning for when we need to find a pump out while cruising. Aside from needing to buy a holding tank monitor and gauge, installing float into the tank requires opening the tank up, not for the faint of heart. There’s also the possibility of the floats getting fouled with Shtuff™ requiring someone to open the tank again to clean it. Not something I really want to put myself into the situation of needing to do.

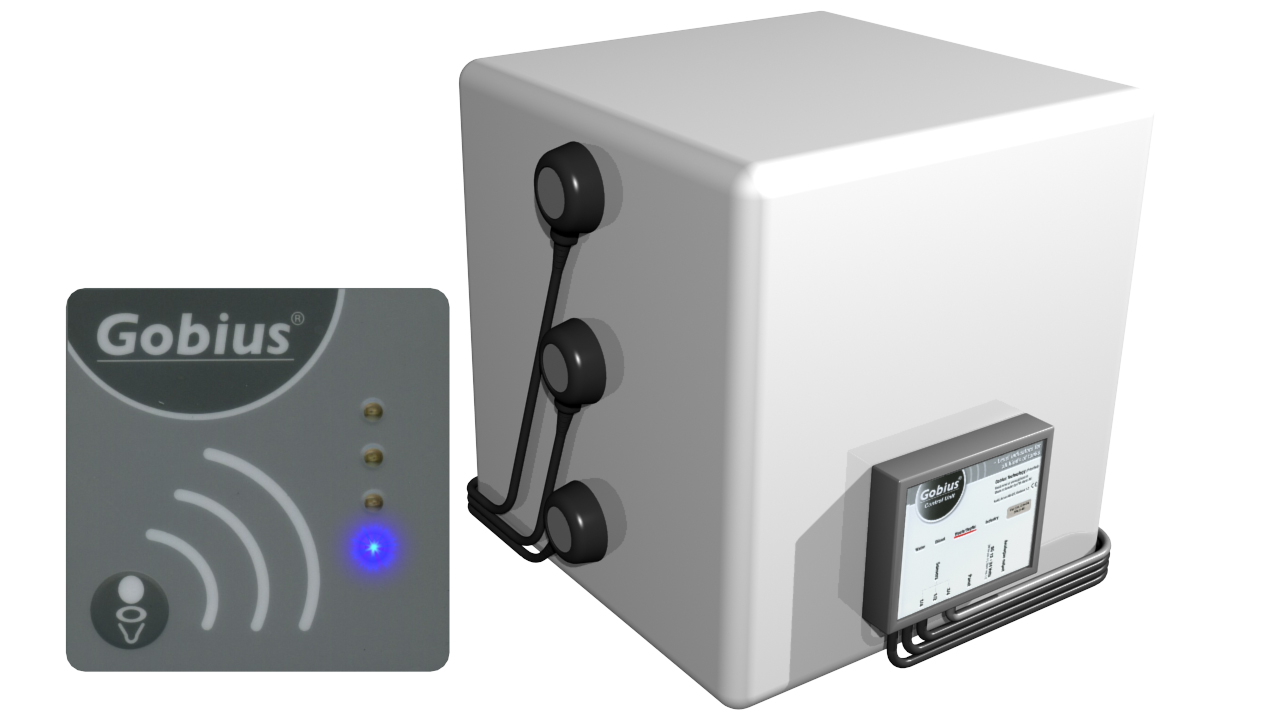
Luckily while at the Seattle Boat Show this year I ran across the Marine Sanitation & Supply booth where they had a demo of a Gobius 4 tank monitor. With 3 ultrasonic sensors that are attached to the outside of practically any tank the Gobius 4 gives you instant monitoring of the fluid level inside with no need to open up the tank, and nothing inside to get fouled. The display shows 4 levels which you can be interpreted as follows..

- Blue = Less than 1/4 full (practically empty)
- Green = Between 1/4 and 1/2 full
- Yellow = Between 1/2 and 3/4 full
- Red = Over 3/4 full (pretty much full)
The system has a control box that controls the ultrasonic sensors, evaluates the sensor data and controls the display. It also has an output that be connected to a standard analog gauge. The same output could be connected to an NMEA2000 tank monitor like the Maretron TLA100 Tank Level Adapter or Garmin GFL 10 Fluid Level Adapter so you can view your tank levels from a chartplotter or other display. The whole setup uses less than 40ma of power as well. Anyway, I managed to get a nice boat show special for two of the systems (we have two heads on Mobert) and it was time to get to work.
 Installing the system is actually pretty simple. The sensors attach to the tank with included 3M VHB acrylic tape, I sanded the surface of our plastic tank a little to rough it up, and then cleaned it with alcohol before attaching the sensors. I’d also read that people had trouble getting the VHB tape to stick if the temperature of the tank/boat/etc wasn’t higher than 68F. The instructions warn about this as well. Luckily we have heat on the boat so it’s not super difficult to get the temperature up to a nice warm 70F+.
First I attached the sensors at 3 positions that I felt best represented how I would measure the level of the tank. Then I mounted the control box. For the forward head I attached the control box to the bulkhead under the tank, but for the aft head I attached it directly to the tank. This was more based on access/convenience than anything else. I don’t trust self-adhesive velcro (which is what Gobius provides for the control box) so I augmented it with 3M CommandStrips as well, something I am super fond of. The 3M VHB tapes needs 15 minutes of no touching to cure.
 After the attachment was all set, I cleaned up the wiring with my other favorite thing (zip-ties) and routed the display cable up near where I planned to mount the display. Once everything was buttoned up it all looked nice and was ready except for one thing… power.
 Since these units draw so little power I really didn’t want to run dedicated power wires through the boat. Our boat has showers in both heads, which use sump pumps to drain the shower water overboard. Each shower sump pump is on its own breaker. So I decided to just tee off of the shower pump power line for the tank monitors. The pumps have switches that are used while you shower to turn the pumps on and off, so the breakers can be left on if desired without running the pumps themselves.
 However since I always hate to cut factory installed wiring harnesses when there is nothing wrong with them, I needed to somehow connect the Gobius power wire into the shower circuit without cutting the existing wires. I decided to create little wiring harnesses that could be inserted between existing connectors and could later be removed if desired, without affecting any of the factory wiring.


I found and ordered through PowerWerx the same T-Connector plugs that Jeanneau used for the shower sump pumps, picked up some 12AWG wire, fuse holders, and a few other items and sat down with a soldering iron. The wiring in the aft head differed from the forward head so I made two completely different wiring harnesses, and in fact the forward head required two harnesses of its own, one to tap the ground and the other to tap into the 12V positive. But with a little forethought, alot of smartphone photos of the boat’s wiring I could view at home, and some patience I made harnesses that worked perfect the first time.
 So there we are.. We now have easy to read holding tank level monitors in both heads, without ever opening up a tank and with no chance in the future of having it get fouled inside the tank. Calibrating the unit is as simple as waiting for the tank to be pumped out and empty, then holding the button on the display for 5 seconds. After that it remembers the calibration even when powered off.
The way the sensors work is that each sensor briefly vibrates the surface of the tank that it is attached to and measures how that vibration is propagated and returned. When fluid is at the level of the sensor the vibrations react differently than when there is no fluid at the sensor. The calibration at empty allows the control unit to “see” how the vibrations act with whatever tank material it’s dealing with to create the baseline. This is why the system works with practically any tank material and size, metal, plastic, fiberglass, etc.
I’m looking forward to knowing ahead of time that we will need to empty the tanks soon, rather than reacting to an already full tank. It’s a pretty simple system and I definitely like it, I expect that won’t change with use unless something goes wrong. Suffice it to say that I’ll report back if there are any issues but I highly recommend the Gobius 4 tank monitor. The only downside is the cost, which is a bit more than other tank monitors on the market. Personally the higher cost is worth the ease of install and not having to open up the tanks. Gobius has versions for water and fuel tanks as well, the difference being the display showing red for empty rather than full.


Nice solution, when you start cruising you probably simplify. On our boat an Oceanis 46 with two heads one tank is closed (for the shitty stuff) and the other tank is always open (for the liquid stuff). One tank with 4 people gives us nearly a week at least if we do not use to much water for flushing.
Toilets are not a nice issue but a permanent one especially clogged joker valves, if you have any smart solution for those I am extremly happy to learn.
Cheers
Constantin
PS: I really like your blog.
Thanks Constantin! Offshore we’ll probably figure out a better solution with the two heads for sure. Not sure what that will be exactly yet.
As far as joker valves, they are definitely a problem, and the Jabsco ones seem to last just about one year. Practical Sailor just did an article saying they found that the Raritan Joker valve works in the Jabsco head and lasts about 3 times longer and are the same price. I picked up a Raritan valve the other day since I’m going to have to replce the joker valve in the aft head pretty soon I’m sure.